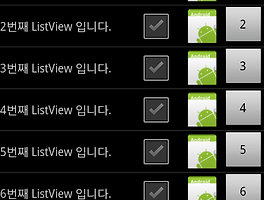
드로이드/Android Custom ListView CheckBox 모두 선택 하기
여기서 ,
checkBox.setFocusable(false);
checkBox.setClickable(false);
를 한 이유는 ListView에서 클릭리즈너가 CheckBox의 클릭리즈너가 겹쳐서 OnItemClickListener가 호출되지 않기 때문입니다.
그래서 CheckBox의 포커스와 클릭에이블을 false로 해주셔야 합니다.
이점 주의 하시기 바랍니다.
package arabiannight.tistory.com;

import java.util.ArrayList;

import android.app.Activity;
import android.content.Context;
import android.os.Bundle;
import android.util.Log;
import android.view.LayoutInflater;
import android.view.View;
import android.view.View.OnClickListener;
import android.view.ViewGroup;
import android.widget.AdapterView;
import android.widget.BaseAdapter;
import android.widget.Button;
import android.widget.CheckBox;
import android.widget.ListView;
import android.widget.Toast;

public class TestCustomListViewActivity extends Activity {

	// Data를 관리해주는 Adapter
	private CustomAdapter mCustomAdapter = null;
	// 제네릭(String)을 사용한 ArrayList
	private ArrayList mArrayList = new ArrayList();

	@Override
	public void onCreate(Bundle savedInstanceState) {
		super.onCreate(savedInstanceState);
		setContentView(R.layout.main);

		setLayout();

		mCountBt.setText("현재 체크된 숫자는 = 0 개 입니다.");

		// ArrayList에 String으로 이루어진 값들을 Add 한다.
		mArrayList.add("첫번째");
		mArrayList.add("두번째");
		mArrayList.add("세번째");
		mArrayList.add("네번째");
		mArrayList.add("다섯번째");
		mArrayList.add("여섯번째");
		mArrayList.add("일곱번째");
		mArrayList.add("여덜번째");

		mCustomAdapter = new CustomAdapter(TestCustomListViewActivity.this , mArrayList);
		mListView.setAdapter(mCustomAdapter);
		mListView.setOnItemClickListener(mItemClickListener);
	}

	// ListView 안에 Item을 클릭시에 호출되는 Listener
	private AdapterView.OnItemClickListener mItemClickListener = new
			AdapterView.OnItemClickListener() {
		@Override
		public void onItemClick(AdapterView arg0, View arg1,
				int position, long arg3) {
			Toast.makeText(getApplicationContext(), ""+(position+1),
					Toast.LENGTH_SHORT).show();

			mCustomAdapter.setChecked(position);
			// Data 변경시 호출 Adapter에 Data 변경 사실을 알려줘서 Update 함.
			mCustomAdapter.notifyDataSetChanged();

		}
	};


	// Custom Adapter
	class CustomAdapter extends BaseAdapter {

		private ViewHolder viewHolder = null;
		// 뷰를 새로 만들기 위한 Inflater
		private LayoutInflater inflater = null;
		private ArrayList sArrayList = new ArrayList();
		private boolean[] isCheckedConfrim;

		public CustomAdapter (Context c , ArrayList mList){
			inflater = LayoutInflater.from(c);
			this.sArrayList = mList;
			// ArrayList Size 만큼의 boolean 배열을 만든다.
			// CheckBox의 true/false를 구별 하기 위해
			this.isCheckedConfrim = new boolean[sArrayList.size()];
		}

		// CheckBox를 모두 선택하는 메서드
		public void setAllChecked(boolean ischeked) {
			int tempSize = isCheckedConfrim.length;
			for(int a=0 ; a<tempSize ; a++){
				isCheckedConfrim[a] = ischeked;
			}
		}

		public void setChecked(int position) {
			isCheckedConfrim[position] = !isCheckedConfrim[position];
		}

		public ArrayList getChecked(){
			int tempSize = isCheckedConfrim.length;
			ArrayList mArrayList = new ArrayList();
			for(int b=0 ; b<tempSize ; b++){
				if(isCheckedConfrim[b]){
					mArrayList.add(b);
				}
			}
			return mArrayList;
		}

		@Override
		public int getCount() {
			return sArrayList.size();
		}

		@Override
		public Object getItem(int arg0) {
			return null;
		}

		@Override
		public long getItemId(int arg0) {
			return 0;
		}

		@Override
		public View getView(int position, View convertView, ViewGroup parent) {

			// ConvertView가 null 일 경우
			View v = convertView;

			if( v == null ){
				viewHolder = new ViewHolder();
				// View를 inflater 시켜준다.
				v = inflater.inflate(R.layout.row, null);
				viewHolder.cBox = (CheckBox) v.findViewById(R.id.main_check_box);
				v.setTag(viewHolder);
			}

			else {
				viewHolder = (ViewHolder)v.getTag();
			}

			// CheckBox는 기본적으로 이벤트를 가지고 있기 때문에 ListView의 아이템
			// 클릭리즈너를 사용하기 위해서는 CheckBox의 이벤트를 없애 주어야 한다.
			viewHolder.cBox.setClickable(false);
			viewHolder.cBox.setFocusable(false);

			viewHolder.cBox.setText(sArrayList.get(position));
			// isCheckedConfrim 배열은 초기화시 모두 false로 초기화 되기때문에
			// 기본적으로 false로 초기화 시킬 수 있다.
			viewHolder.cBox.setChecked(isCheckedConfrim[position]);

			return v;
		}
	}

	class ViewHolder {
		// 새로운 Row에 들어갈 CheckBox
		private CheckBox cBox = null;
	}


	private ListView mListView = null;
	private CheckBox mAllCheckBox = null;
	private Button mCountBt = null;

	/*
	 * Layout
	 */
	private void setLayout(){
		mListView = (ListView) findViewById(R.id.main_listview);
		mCountBt = (Button) findViewById(R.id.main_text_button);
		mCountBt.setOnClickListener(new OnClickListener() {
			@Override
			public void onClick(View v) {
				mCountBt.setText("현재 체크된 숫자는 = "+
						mCustomAdapter.getChecked().size()+" 개 입니다.");
				// 체크되 있는 CheckBox의 Position을 얻어 온다.
				for(int i=0 ; i<mCustomAdapter.getChecked().size() ; i++){
					Log.d("test", "체크되 있는 Position = " +
							mCustomAdapter.getChecked().get(i));
				}
			}
		});

		mAllCheckBox = (CheckBox) findViewById(R.id.main_all_check_box);
		// 전체 체크 버튼 클릭시 Listener
		mAllCheckBox.setOnClickListener(new OnClickListener() {
			@Override
			public void onClick(View v) {
				mCustomAdapter.setAllChecked(mAllCheckBox.isChecked());
				// Adapter에 Data에 변화가 생겼을때 Adapter에 알려준다.
				mCustomAdapter.notifyDataSetChanged();
			}
		});
	}
}
여기서 ,
checkBox.setFocusable(false);
checkBox.setClickable(false);
를 한 이유는 ListView에서 클릭리즈너가 CheckBox의 클릭리즈너가 겹쳐서 OnItemClickListener가 호출되지 않기 때문입니다.
그래서 CheckBox의 포커스와 클릭에이블을 false로 해주셔야 합니다.
이점 주의 하시기 바랍니다.
 |  |
'Android > Listview' 카테고리의 다른 글
| 안드로이드/Android ExpandableListView 만들기 - 2 - (속성 추가) (8) | 2013.02.25 |
|---|---|
| 안드로이드/Android ListView Header, Footer 설정 하기 ~! (3) | 2013.01.10 |
| 안드로이드/Android AdapterView.onItemClickListener 사용법 (2) | 2012.04.03 |
| 안드로이드/Android ExpandableListView 만들기 (31) | 2012.03.29 |
| 안드로이드/Android ArrayAdapter, BaseAdapter를 이용한 ListView 구현 (3) | 2012.03.28 |
 TestCustomListView.zip


